To season firewood, first split logs into smaller pieces for faster drying. Stack the wood off the ground in a single row, with space between each piece for air circulation. Cover the top to protect from rain, but leave the sides exposed for ventilation. Let the firewood dry for 6-12 months before use.
If you’re planning to use your fireplace or wood-burning stove this year, you need to have dry or seasoned firewood to go in them. Otherwise, the green wood will just sit down and smolder all night, creating smoke.
Firewood is great to cut down some of your utility bills, and a perfectly seasoned wood supply is necessary for passing a warm evening by the fire. However, seasoning is time-consuming, and you must know how to properly season firewood with the necessary techniques to get the best out of your wood logs.
In this article, I will discuss all the tips and tricks of seasoning firewood so you get dry and effective firewood throughout the year.
Table of Contents
Understanding Seasoned Firewood
Seasoned firewood is wood that has been dried for long enough that its moisture content has dropped below 20%. It burns with the most heat, highest efficiency, and lowest smoke generation. Seasoned wood also generates the least amount of creosote, which is black soot that can form in your chimney, leading to fires. Seasoning can take between 4 and 24 months, depending on the density of the wood, its starting moisture levels, and how it is stacked.
How to Season Firewood – Step-by-Step Procedure
Typically, greenwood contains 50% moisture, making it difficult to burn directly. By seasoning, you can reduce the moisture level to 20% or less so that the wood burns more efficiently.
The seasoning process requires the storage of firewood for an extended period. Below I have provided the simplest procedure for seasoning firewood. Let’s have a look.
Step 1 – Choose the Right Wood
There are two main types of wood in general; Hardwood and Softwood. You should pick an easily attainable wood type that burns for longer periods. Check out the properties of hardwood and softwood below and choose according to your needs.
Hardwood
Oak, Birch, Hickory, Maple, and most fruit trees are good hardwood sources for your fireplace. These logs are denser and heavier than softwood. Furthermore, they burn more intensely and longer to keep you warm all night.
Moreover, they usually leave a good coal bed, making it easy to revive the fire in the morning – however, you will have a hard time lighting these logs. The seasoning process for hardwood takes from 12 to 18 months.
Softwood
Pine, Cedar, Spruce, and Fir are some most common softwood you can use. Softwood logs are lighter and easier to light up. Though these logs burn lightly, you will get enough heat to stay toasty.
Usually, they are used as scrap for kindling or to start a fire. It needs only 6 to 12 months to season softwood. However, excessive use of softwood can build up creosote in your chimney. So keeping the household clean will be a bit tricky.
I recommend you use hardwood as the main burning source and softwood for kindling. This way, you will get the best of both worlds.

Step 2 – Start at the Right Time
You will get sufficiently seasoned firewood next winter if you start cutting wood in early spring. Thus, try to cut trees twice a year, once early in the spring and early in the fall. This way, you’ll get an approximate date to start seasoning.
Some also prefer chopping trees in winter as the moisture level in the tree trunks is at the lowest during the season. This consequently helps the wood to dry faster.
Step 3 – Cut to Length
Start by measuring the diameter of your stove or the fireplace you’ll use for burning. The length of the wood logs should be 3-inch shorter than those measurements.
Chopped pieces should be at least 6 inches and not longer than 18 inches. The smaller the pieces, the easier to season and store.
After cutting, you can split the logs in several ways. Splitting them into halves will be quicker if you work with lots of wood. Depending on the diameter of the wood, you may have to split them further before use.
You can split them into thirds or quarters to allow them to dry faster. As a result, you get smaller pieces for better drying and storing.

Step 4 – Stack the Pieces
This is probably the most important part of the seasoning process as you need to stack the wood properly and leave them for months. So you have to get it right.
Here’s how you can stack the firewood:
- Choose a suitable place outdoor that gets enough sunlight and airflow. Your woodpiles should be facing west to catch the evening sun.
- Stack the wood in an elevated place to save them from rot, fungus, mold, and unwanted critters. You can use wooden or metal racks, pallets, or concrete floors.
- You can also make a shed with proper air circulation. As seasoning requires a long period, sheds can be useful to save the wood from heavy snowfall and rain.
- Avoid stacking too tightly. Leave breathing space between the wood pieces to ensure that all the pieces get proper air and sunlight.
Step 5 – Cover the Firewood Pile
Once you’re done stacking, it’s time to cover your firewood. Covering helps the pile remain clean and safe from rain and snow. This also helps to prevent termites from eating your firewood.
Simply use a tarp to cover the upper portion of the pile. You don’t want to cover over one-third of the pile since it will block sunlight and wind.
Step 6 – Give It Enough Time
When your pile is ready, just leave it in the outside air for drying. There is no fixed answer to how long firewood takes to dry. It can be from 6 months to 2 years, depending on the type of wood.
So have patience and check the wood for mold or fungus build-up occasionally.

Step 7 – Check the Moisture Content
After you have given proper time for seasoning, check the dryness of the wood to ensure it’s seasoned properly. Here’s how to do that:
- Using a moisture meter is the easiest way to check dryness.
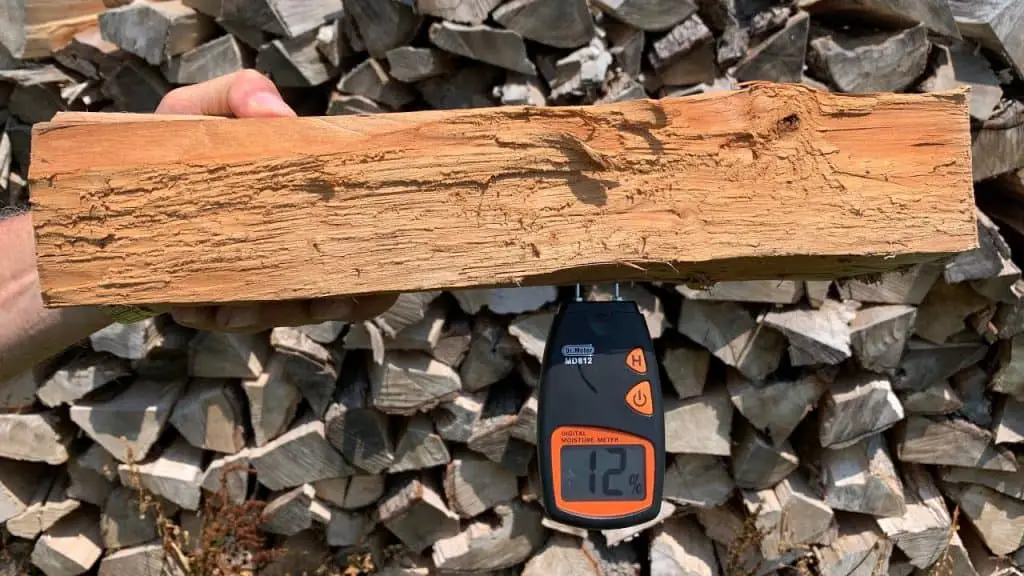
- Take a log and insert the probes of a moisture meter to instantly get the moisture content percentage. If the moisture level is less than 20%, your wood is ready to be used.
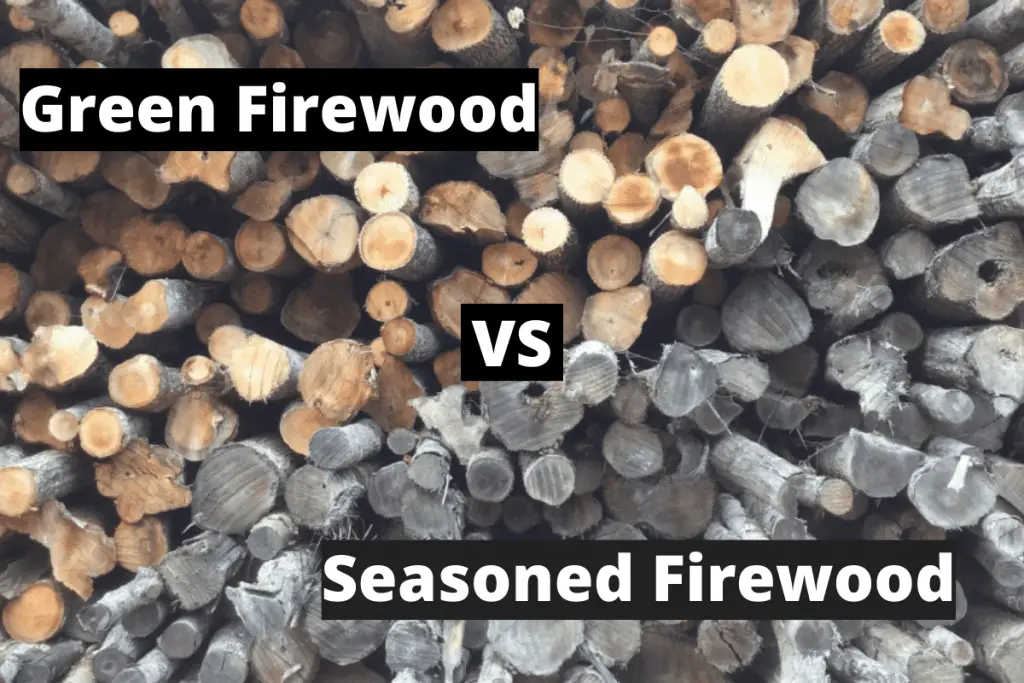
- You can also examine the appearance of the wood pieces. If the wood piece has a pale color, peeled bark, and visible cracks, it’s a sign that the wood is dried out. Also, the dried wood will be comparatively lighter.
- Take two pieces of wood and knock them together. If you hear a dull thud, the wood isn’t dried well. When completely dried out; the wood pieces will create more of a ringing noise instead.
- Take a log and burn it on the stove to be assured. If the log burns without making much smoke, it confirms proper seasoning.
I personally recommend this General Tools Moisture Meter. It allows you to accurately gauge how wet your firewood is and whether it is sufficiently seasoned. Over time you can also see how quickly the moisture is dropping and how much longer you need to keep your firewood dropping until it is seasoned and ready to burn.
Press the sharp pins into the wood and you will quickly see the readout show the moisture ranging from 5% to 50%. It also has a Low/Mid/High indication depending on whether the wood is dry enough, so you don’t need to remember the actual values.

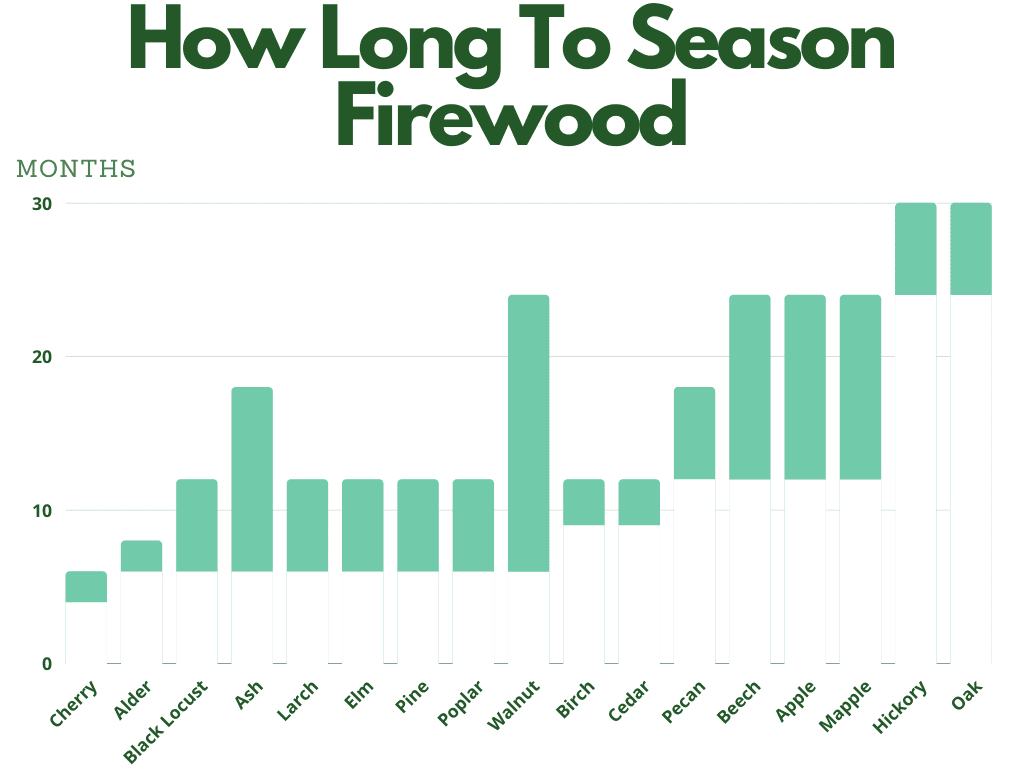
Firewood Seasoning Time Chart
| Type of Firewood | Drying Time in Months |
| Cherry | 4 months |
| Elm | 6 months |
| Black Locust | 6 months |
| Alder | 6-8 months |
| Mesquite | 6-9 months |
| Cottonwood | 6-12 months |
| Pine | 6-12 months |
| Larch | 6-12 months |
| Juniper | 6-12 months |
| Poplar | 6-12 months |
| Aspen | 6-12 months |
| Osage Orange | 6-12 months |
| Cedar | 9-12 months |
| Birch | 9-12 months |
| Ash | 6-18 months |
| Black Walnut | 6-24 months |
| Almond | 12 months |
| Spruce | 12 months |
| Mulberry | 12 months |
| Douglas Fir | 12 months |
| Pecan | 12-18 months |
| Beech | 12-24 months |
| Elm | 12-24 months |
| Maple | 12-24 months |
| Apple | 12-24 months |
| Sycamore | 12-24 months |
| Olive | 12-24 months |
| Pear | 12-24 months |
| Yew | 18-24 months |
| Chestnut | 24 months |
| Oak | 24 months |
| Hickory | 24 months |
Conclusion
This is how to season firewood to manage the upcoming chilly nights. It will become an effortless task once you get acquainted with the procedure.
Seasoning takes time, but getting faster, safer, and more effective heat is essential. So make sure to season your wood to enjoy those extra-long chilly winter nights with a cup of hot cocoa.
