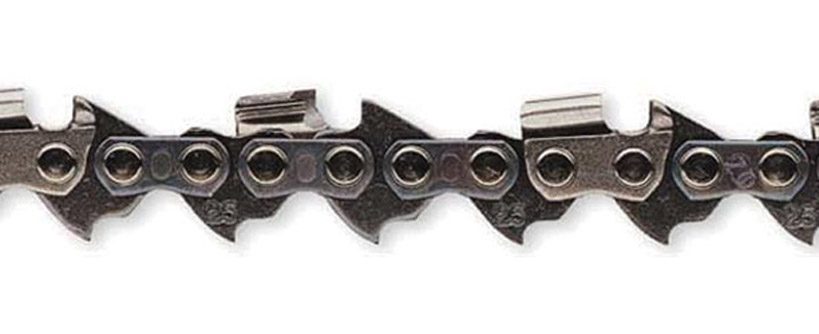
To put a chain on a chainsaw, follow these steps: 1) Ensure the chainsaw is off and remove the side cover. 2) Loosen chain tensioner. 3) Align the chain on the bar, ensuring the sharp edges face forward. 4) Attach the bar and chain, adjust tension, and replace the side cover. 5) Test for proper tension.
One of the first tasks you will need to learn when you get your first chainsaw is how to replace the chain. For beginners, this can be tricky, so I have put together this guide to explain how. You will need to replace your chain after every 10 sharpens or when the cutters are damaged beyond repair. You will also need to take your chain on and off regularly to clean it and clean your entire chainsaw.
I can assure you that you will quickly become proficient at taking your chain on and off, so let’s dive into the technique.
Table of Contents
When to Replace a Chainsaw Chain?
Your chain should be replaced when it cannot be resharpened, generally around every ten sharpens. It should also be replaced if the cutters are damaged, or the depth gauges have been filed down to nothing. You will learn quickly when a chain has lost all its metal and stopped cutting at its maximum efficiency.
Cutting wood with a chainsaw fatigues your muscles by holding up the heavy machine, so running it with a worn-out chain will make every cut take longer and wear you out.
You should also take your chain on and off every time you give it a deep clean in an ammonia solution.

How to Put a Chain on a Chainsaw
Putting a chain on a chainsaw is simple and can be summarized in four key steps:
- Release the tension on the chain
- Remove the old chain
- Install the new chain
- Re-tension the chain
This looks easy, but the difficulty is accessing each of these components and the covers that need to be removed to complete each one. The model of chainsaw you have may also be slightly different but will follow these standard guidelines.
Tools Required
Putting a chain onto a chainsaw is relatively simple and only requires three tools:
- Screwdriver
- 1/2 inch pipe wrench (or whatever your model of chainsaw requires)
- A new chain
That is all you need, so let’s get started.
Step 1 – Preparation
Set the chainsaw on a stable surface. If you pulled the chainsaw apart, put it all back together, including reattaching the guide bar.
Unlock the chain brake so it can rotate freely. A safe method is to unscrew the spark plug, ensuring that the engine cannot start.
Step 2 – Remove the Sprocket Cover
Undo the bolts holding on the sprocket cover. This will give you access to the sprocket and is different in each model. Most chainsaws use a 1/2 inch bolt for their sprocket covers.
Step 3 – Remove the Chain Tensioner
Release the tension on the chain by unscrewing the chain tensioner. You can then pull the nose of the guide bar away from the powerhead to release the tension completely. Loosen the tension off completely by screwing in an anti-clockwise direction.
Step 4 – Remove the Old Chain
This will allow the entire chain to be loose and easily removed from the guide bar. An easy method is to use a screwdriver to pry the chain off the bar if there are any tight points.
Step 5 – Install the New Chain
Thread the new chain onto the guide bar. Make sure the drive links are set in the channel and are set in the sprocket.
Check the chain direction. The cutters should be facing forward and upwards with the rakers immediately in front of them. If you install the chain backwards, you will quickly know because your chainsaw won’t cut at all.
Step 6 – Reinstall the Chain Tensioner
Pull the nose of the guide bar out until it seats and can be secured tightly with the adjustment pin. Adjust the chain tension again until the chain cannot fall off but is tight enough to rotate freely. The chain tensioner tightens in a clockwise direction.
Step 7 – Reinstall the Sprocket Cover
Attach the sprocket cover back on to protect all the internal components. Keep in mind, that you may need to take this off again to adjust the tension as the machine heats up and expands after it is run in.
Step 8 – Run the Chainsaw
Whenever you put on a new or clean chain, you will remove all the bar oil between the chain and the guide bar that needs to be replaced before use. The easiest way is to start your chainsaw and let it run slowly for 1-2 minutes to give the oil pump enough time to coat the mechanical components with enough bar oil to lubricate the machine.
You will often find the chain tension needs to be adjusted again as the mechanical components heat up and expand.
Which Direction Should the Chain Go?
A common mistake is putting the chain on backwards. There is a simple method for determining the correct chainsaw chain direction. On top of the chain are two components – the cutters which are sharp, and the depth gauges (or rakers), which are blunt. The rakers are in front of the cutters, which is a simple way to identify the forwards direction.
The second method is that the cutters are angled upwards and forwards. So the cutter’s highest point indicates the chain’s forward direction.
Conclusion
I hope this has given you a thorough understanding of how to install a chainsaw chain correctly in a simple and easy method. Given enough experience, you will find yourself taking the chain on and off frequently, so spend the time in the beginner to fully understand how to do it – this will save you time in the long term.
